Démonstration
Pour être le plus clair possible, on va créer une petite application permettant l'encodage du nom d'une personne. Ce nom doit être de minimum 2 caractères. Si ce n'est pas le cas, il faut remonter une erreur.

Création de l'application de base
Code XAML
<UserControl x:Class="SilverlightBusinessValidation.MainPage"
    xmlns="http://schemas.microsoft.com/winfx/2006/xaml/presentation"
    xmlns:x="http://schemas.microsoft.com/winfx/2006/xaml"
    xmlns:d="http://schemas.microsoft.com/expression/blend/2008"
    xmlns:mc="http://schemas.openxmlformats.org/markup-compatibility/2006"
    mc:Ignorable="d" d:DesignWidth="640" d:DesignHeight="480">
    <Grid x:Name="LayoutRoot">
        <Grid.RowDefinitions>
            <RowDefinition Height="25px"/>
            <RowDefinition Height="25px"/>
        </Grid.RowDefinitions>
        <Grid.ColumnDefinitions>
            <ColumnDefinition Width="50px"/>
            <ColumnDefinition Width="300px"/>
        </Grid.ColumnDefinitions>
        <TextBlock Text="Nom:" Grid.Column="0" Grid.Row="0"/>
        <TextBox Name="txtNom" Grid.Row="0" Grid.Column="1" Text="{Binding Path=Nom,Mode=TwoWay}"/>
        <TextBlock Text="Age:" Grid.Column="0" Grid.Row="1"/>
        <TextBox Name="txtAge" Grid.Row="1" Grid.Column="1" Text="{Binding Path=Age,Mode=TwoWay}"/>
    </Grid>
</UserControl>
Code C# de remplissage de la source de données
public partial class MainPage : UserControl
{
    public MainPage()
    {
        InitializeComponent();
        this.DataContext = new Identite();
    }
}
Classe "business avec une petite regle de validation pour le nom dans le "set"
public class Identite
{
    private string nom;
    private int age;

    public string Nom
    {
        get { return this.nom; }
        set
        {
            if (value.Length < 2)
                throw new ValidationException("Le nom ne peut pas être inférieur à 2 caractères");
            this.nom = value;
        }
    }

    public int Age
    {
        get { return this.age; }
        set { this.age = value; }
    }
}
Mise en place d'une validation de base
Comme vous pouvez le voir en testant le code ci-dessus. Aucune erreur n'est remontée sur l'ui. En effet pour avoir une erreur remontée, il faut activer la gestion des erreurs dans le binding de la propriété en settant "true" la propriété ValidatesOnExceptions.

Code XAML
<UserControl x:Class="SilverlightBusinessValidation.MainPage"
    xmlns="http://schemas.microsoft.com/winfx/2006/xaml/presentation"
    xmlns:x="http://schemas.microsoft.com/winfx/2006/xaml"
    xmlns:d="http://schemas.microsoft.com/expression/blend/2008"
    xmlns:mc="http://schemas.openxmlformats.org/markup-compatibility/2006"
    mc:Ignorable="d" d:DesignWidth="640" d:DesignHeight="480">
    <Grid x:Name="LayoutRoot">
        <Grid.RowDefinitions>
            <RowDefinition Height="25px"/>
            <RowDefinition Height="25px"/>
        </Grid.RowDefinitions>
        <Grid.ColumnDefinitions>
            <ColumnDefinition Width="50px"/>
            <ColumnDefinition Width="300px"/>
        </Grid.ColumnDefinitions>
        <TextBlock Text="Nom:" Grid.Column="0" Grid.Row="0"/>
        <TextBox Name="txtNom" Grid.Row="0" Grid.Column="1"
           Text="{Binding  Path=Nom,Mode=TwoWay,NotifyOnValidationError=true,ValidatesOnExceptions=true}"/>
        <TextBlock Text="Age:" Grid.Column="0" Grid.Row="1"/>
        <TextBox Name="txtAge" Grid.Row="1" Grid.Column="1"
           Text="{Binding Path=Age,Mode=TwoWay,NotifyOnValidationError=true,ValidatesOnExceptions=true}"/>
    </Grid>
</UserControl>
Customisation de la remontée d'erreurs de validations
Afin d'avoir la possibilité d'avoir l'élément levé d'erreur de validation, il faut activer la propriété NotifyOnValidationError dans le binding. Le code ci-dessous coloriera la textbox en rouge en cas d'erreur.

public partial class MainPage : UserControl
{
    public MainPage()
    {
        InitializeComponent();
        this.DataContext = new Identite();
        this.txtNom.BindingValidationError +=
                                new EventHandler<ValidationErrorEventArgs>(txtNom_BindingValidationError);
    }

    private void txtNom_BindingValidationError(object sender, ValidationErrorEventArgs e)
    {
        ((Control)e.OriginalSource).Background = new SolidColorBrush(e.Action == ValidationErrorEventAction.Added
                                                                         ? Colors.Red : Colors.White);
    }
}
Utilisation des "data annotations"
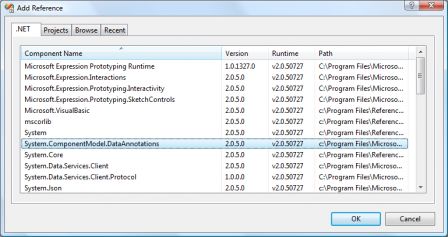
L'utilisation des data annotations demande l'ajout de la reference à la DLL.

Implémentation de la validation via attribut standard fourni dans le framework
public class Identite
{
    private string nom;
    private int age;

    [StringLength(100, MinimumLength = 2, ErrorMessage = "Le nom ne peut pas être inférieur à 2 caractères")]
    public string Nom
    {
        get { return this.nom; }
        set
        {
            Validator.ValidateProperty(value, new ValidationContext(this, null, null) { MemberName = "Nom" });
            this.nom = value;
        }
    }

    public int Age
    {
        get { return this.age; }
        set { this.age = value; }
    }
}
Implémentation de la validation via attribut "custom". Cette méthode offre la possibilité de créer une véritable validation fonctionnelle.
public class CustomClassValidationAttribute : ValidationAttribute
{
    public string Nom { get; set; }
    public int MinimumLength { get; set; }

    protected override ValidationResult IsValid(object value, ValidationContext validationContext)
    {
        string chaine = (string)value;
        if(chaine.Length >= this.MinimumLength)
            return ValidationResult.Success;

        return new ValidationResult(string.Format("Le {0} ne peut pas être inférieur à {1} caractère(s)", this.Nom, this.MinimumLength));
    }
}

public class Identite
{
    private string nom;
    private int age;

    [CustomClassValidationAttribute(MinimumLength = 2, Nom="nom")]
    public string Nom
    {
        get { return this.nom; }
        set
        {
            Validator.ValidateProperty(value, new ValidationContext(this, null, null) { MemberName = "Nom" });
            this.nom = value;
        }
    }

    public int Age
    {
        get { return this.age; }
        set { this.age = value; }
    }
}
Implémentation d'une validation non pas d'une "classe" de validation mais d'une méthode dans une classe
public class CustomClassAvecMethode
{
    // public & static !
    public static ValidationResult MethodeMinLength(string value)
    {
        if (value.Length >= 2)
            return ValidationResult.Success;

        return new ValidationResult("Le nom ne peut pas être inférieur à 2 caractères");
    }
}

public class Identite
{
    private string nom;
    private int age;

    [CustomValidation(typeof(CustomClassAvecMethode), "MethodeMinLength")]
    public string Nom
    {
        get { return this.nom; }
        set
        {
            Validator.ValidateProperty(value, new ValidationContext(this, null, null) { MemberName = "Nom" });
            this.nom = value;
        }
    }

    public int Age
    {
        get { return this.age; }
        set { this.age = value; }
    }
}
Conclusion
Voici donc en quelques lignes comment implémenter vos validations sous Silverlight 3. Vous avez d'autres techniques ? Laissez un commentaire :-)

